
Failing the Google AdSense review can be incredibly frustrating, especially after multiple attempts. However, rejection is usually a signal that your site lacks specific “Trust Signals” or structural integrity.
To move from rejection to approval, follow this rigorous, Step-by-Step AdSense Re-application Checklist designed to clean up your SEO and policy compliance.
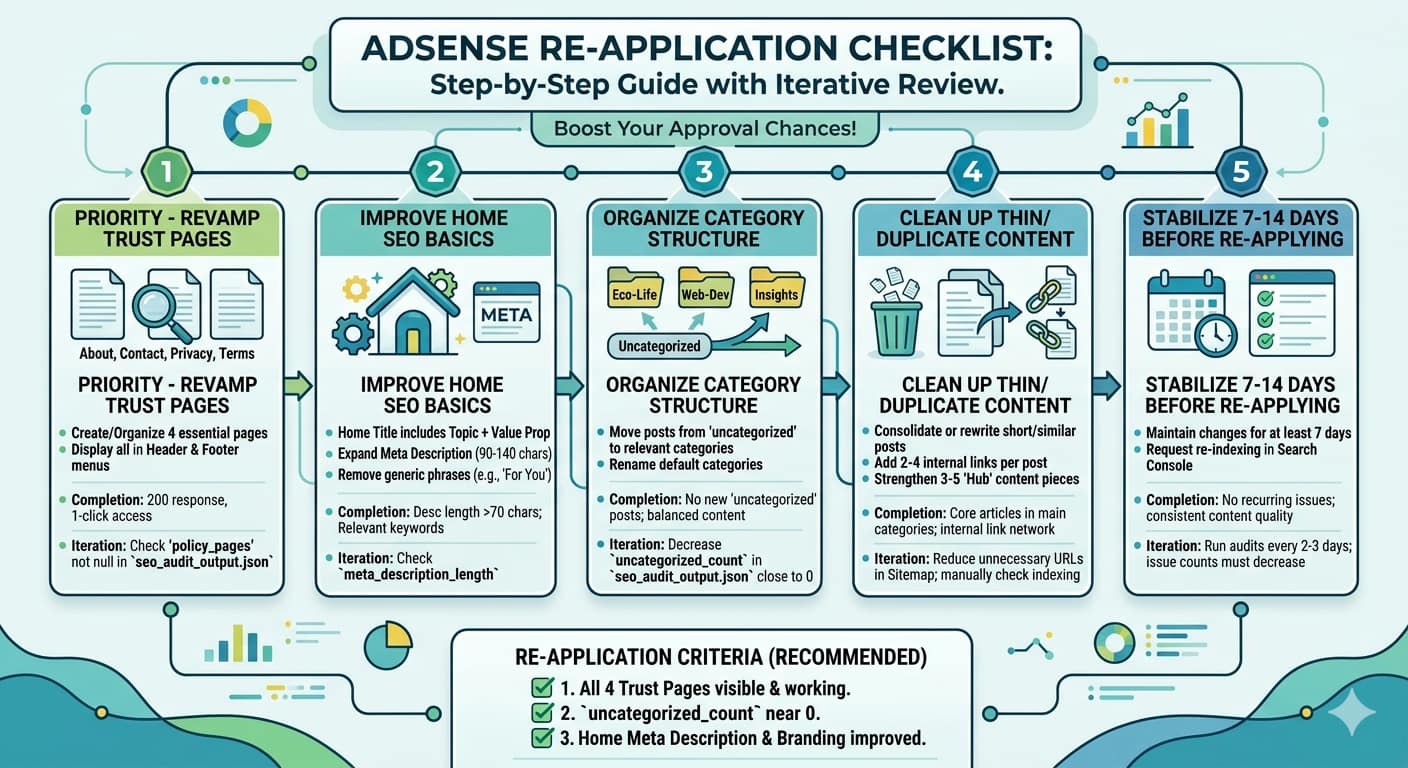
Step 1: Optimize Trust & Policy Pages (Highest Priority)
Google prioritizes user safety and transparency. If your “Trust Pages” are missing or hidden, approval is nearly impossible.
- Actions:
- Create or update four essential pages: About, Contact, Privacy Policy, and Terms of Service.
- Ensure all four pages are clearly visible in both the Header and Footer menus.
- Success Criteria:
- Each page must return a
200 OKHTTP status. - Pages must be accessible within one click from the homepage.
- Each page must return a
- Audit Check:
- Verify that
policy_pagesin your SEO audit tools are no longer null.
- Verify that
Step 2: Revamp Home SEO & Branding
Your homepage is the “front door” for Google’s crawlers. It needs to clearly define what your site is about.
- Actions:
- Home Title: Include your site name + a clear Value Proposition (e.g., “Silver Edge | Strategic Design & Tech Consulting”).
- Meta Description: Expand to 90–140 characters.
- Remove generic filler text like “Welcome to my blog” or “For you.” Replace them with keyword-rich, descriptive sentences.
- Success Criteria:
- Meta description length: At least 70 characters.
- Primary niche keywords included naturally.
- Audit Check:
- Review
meta_description_lengthto ensure it meets the threshold.
- Review
Step 3: Clean Up Category Structure
A messy site taxonomy suggests low-quality management. Google dislikes the “Uncategorized” label.
- Actions:
- Move all posts from “Uncategorized” to specific, meaningful categories (e.g.,
web-development,lifestyle-tech,real-estate-insights). - Rename default WordPress categories to reflect your niche.
- Move all posts from “Uncategorized” to specific, meaningful categories (e.g.,
- Success Criteria:
- Stop using the “Uncategorized” tag for both new and existing posts.
- Ensure an even distribution of posts across your main categories.
- Audit Check:
uncategorized_countshould be zero.
Step 4: Prune Low-Quality & Duplicate Content
AdSense requires “Valuable Inventory.” Thin or repetitive content is a common reason for rejection.
- Actions:
- Consolidate: Merge short, similar posts into one comprehensive guide.
- Internal Linking: Add 2–4 internal links to every post to create a “content web.”
- Pillar Content: Strengthen 3–5 “Hub Posts” (guides or long-form essays) for each major category.
- Success Criteria:
- Every major category has at least one high-quality “Pillar” post.
- A strong internal link network is visible to crawlers.
- Audit Check:
- Confirm index status in Google Search Console for all high-value URLs.
Step 5: The Stabilization Period (7–14 Days)
Do not re-apply immediately after making changes. Give Google’s bot time to recognize the improvements.
- Actions:
- Maintain the updated structure for at least 7 days before hitting “Re-apply.”
- Request manual re-indexing for updated pillar pages via Google Search Console.
- Success Criteria:
- No new policy or structural errors in the console.
- Consistency in the quality of new posts published during this period.
- Audit Check:
- Run a full site audit every 3 days. The number of SEO “Issues” should be trending toward zero.
Final Verdict: When Should You Re-apply?
Only click that “Re-submit” button once you can check off these three items:
- [ ] All 4 Policy Pages are live and linked in the footer.
- [ ] Uncategorized Count is 0.
- [ ] Home Meta Description is professional, branded, and keyword-optimized.
Good luck! With a structured approach, your next application stands a much higher chance of success.